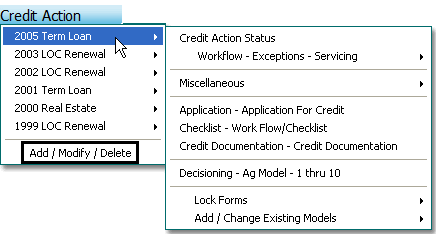
Credit Action Menu
What do you call the form that you use when a customer comes to you with a request for financing? An application? A request? An inquiry? Yes, all the above. Since Lending Cloud is used by lenders world wide, we simply call the form a credit action and let each organization totally customize and title the forms anything they like.
The Credit Action menu allows you to quickly generate a credit action form that contains any and all information necessary for a particular loan request at a particular point in time -- based on analysis models that have already been created for you by your system administrator. The fly-out menu is an example of some of the items you can have available for a particular credit action. It all starts by clicking on the Add/Modify/Delete menu item, on which you create the credit action forms you want.
IMPORTANT: Your system administrator determines what menu items display in all menu lists, thus, some features explained on menu bar items here in eHelp may not be available to you in the program. See your system administrator about any features that do not display for you.
Add / Modify/ Delete a Credit Action Form
Use the features across the top of the screen below to get started creating a credit action form:
-
Description: Enter a description for the credit action. (Example: 2005 Renewal)
-
Model Selection Filter Link: This feature is used to filter multiple credit action models by loan amount, type of loan, type of product, etc. It allows you to quickly access the exact credit action you need. Use this feature as needed. Click here for a screen sample of this feature.
-
Add Link: Click "Add" to post the credit action in the list.
Credit Action Categories
When the credit action is posted in the list, several categories will appear that help you input all the necessary customer information required for the type of loan application you have chosen. Clicking on each will automatically enable the tabbing feature and the specific section of the system for you to fill out. The category titles are customizable by your institution, so the samples we discuss here may not be the one's your institution ends up using.

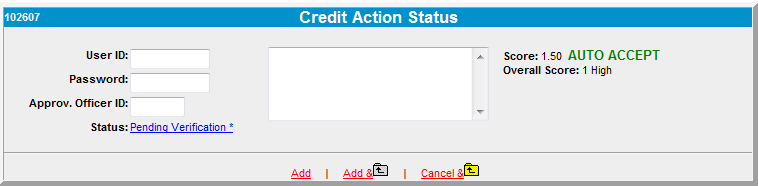
Status
Check on and add to the status of a credit action form. In addition to selecting the appropriate status, you can also post comments. If your institution uses any type of identification number in your loan process, you can enter that here as well.
Application
Displays the application specific to the credit action model you have chosen.
Workflow Checklist
You can choose from a variety of checklist models here.
Credit Presentation/Narrative
Access institution-specific credit documentation forms here. Functionality in the WordPads here allows for attaching images and basic spreadsheet content to your Credit Presentation. For information about working with WordPads, including using the spell check program and adding text near graphics, see WordPads.
Credit Approval
You can create institution-unique forms here.
Decisioning
In this category you apply a credit bureau score and/or a risk rating to your credit action. The first thing to do here is click the "Score Now" link at the top center of the screen. This will display the "Update Decisioning" dialog box where you will choose the data you want your ratios and indicators based upon. Using the drop lists provided, choose the balance sheet and income/expense years you want, then click the "Update & Score" link to have they system calculate the ratios and indicators based on this data. The results will display on the screen and you can add comments about this decision using the text input field at the bottom of the screen.
FSA Guarantee
Learn more about an FSA application by clicking here: FSA
Letters
Maintain all your correspondence associated with this credit action.
Borrowing Base
Maintain all collateral associated with this credit action.
Covenant Tracking | Monitor the borrower’s financial performance and condition for this credit action.
Additional Credit Action Features
-
Duplicate Link | You can duplicate all information for this credit action for another use.
-
Track Link | View all the users that have accessed this particular credit action.
-
Save & Update Link
You can save yourself a lot of data entry time by clicking on the update link located at the top of every category form. These links allow you to automatically populate data fields that are alike from previously entered customer data. The update links are located at the top-left of each credit action form. If you are using a decision form and create a new credit action or replace a previous one, and then score the information prior to updating the form itself, you will receive a red message on the top right corner of the page Loan Application Date, Score Date Mismatch. To get rid of the message, simply click the Update link first, then re-click the Score Now link.
Watch List
Your system administrator is responsible for providing you this valuable feature to alert you to the possibility that a customer may not be credit worthy for the request. If this functionality is provided for you, you will see it at the top of whichever credit action form your system administrator deems necessary. The notice will look something like the sample below and display one of the three status categories for you to base your forward motion on a particular loan request. The Watch List is accessed via the File menu.
Workflow Icons
|
|
Comments Icon: Use this icon to enter comments specific to the section of the program where you see this icon available. Clicking on it will display a small test input pop-up window. When you do enter comments here, the blank sheet of paper icon changes to paper with lines on it, denoting that comments exist. |
|
|
Letters Icon: Use this icon to add pre-customized correspondence to a credit action. Clicking here will display a drop list where you can choose the type of letter you want, which has been provided by your system administrator. When you do add a letter to a credit action, the envelope changes to show a letter popping out of the envelope, denoting that a letter(s) exist. Click here to view more. |
|
|
Attachments Icon: Use this icon to attach electronic files to this credit action. You may want to attach a photo of the collateral for the loan, a signed balance sheet or tax return. When you to attach a file to a credit action, the paper clip changes to a paper clip on a letter, denoting that an attachment(s) exists. Click here to learn more about attachments . |
|
|
eNotice Icon: Use this icon to email colleagues or customers from within Lending Cloud. The email will contain a link to the exact credit action you are in -- at the time you send the email -- so the recipient can access that information and respond to your information request or applicable response to your eNotice. When you do send an eNotice, the envelope will change to include a letter sticking out of the top of the envelope, denoting an eNotice(s) exists. Click here to learn more about eNotices . |
|
|
Workflow Icon: Use this icon to access the workflow for this credit action. Click here for more information. |
|
|
Loan Documentation Export: Use this icon to export Lending Cloud information to LaserPro or ARTA loan documentation systems. |
|
|
Borrowing Base / Inspection Report Certificates: Certain types of loans, particularly asset-based loans, require that a borrower provide the lender with |
|
|
Covenant Tracking: This feature allows you to maintain an updated picture of the borrower’s financial performance and condition. |
|
|
Sources and Uses: This feature allows you to setup a sources & uses form. Click here to learn more about this feature. |
|
|
Construction Advance: This feature allows you setup a Construction Advance Inspection form. Click here to learn more about this feature. |
Lock / Unlock Forms
Although program security is dictated by the system administrators, users are empowered with some control over the accessibility of their credit action forms. To that end, each credit action form category can be locked and unlocked as needed. Other users can still access these areas and attempt to change data, however, any modifications they make are not saved. When you lock a category a padlock symbol will appear in that category on the main credit action screen. The name/date/time stamp for the person who locked the form will display in red at the top of the form.
![]()

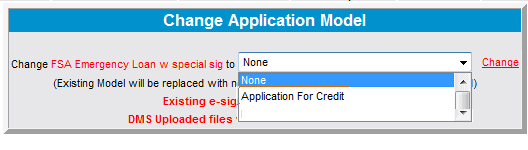
Add/Change Existing Models
This feature will help you better adapt to changes that will occur in your credit action forms. For example: The $200,000 real estate loan you provided a customer five years ago was approved based on models for a $200K credit action form. Now that customer needs a $500K real estate loan and your organization has made adjustments to the information they want to see for that loan amount and higher. Simply exchange the old model for the new model and you have just saved yourself and your customer a lot of time.
Default Model Changed Warning
If there have been additions or deletions of items to any credit action form in the defaults section of the system, a message will display on the upper left corner of the credit action form being used. This way, the user will know there have been changes made to this form and it will need to be switched out with the updated information.
If you make changes in your Balance Sheet / Income & Expense or other areas within a customer and would like this reflected in your credit action forms, you will need to re-update the form to bring in any new information. When you add a credit action, information will automatically populate the credit action fields from the General Information. Ultra information will still need to be updated. Any changes made in the customer after this point will need to be updated.
Update a Credit Action Form and Report
You can control the Rents Received sections that appear on the Credit Action form and the Credit Action report. The check boxes appear if they are marked to use on any Rents Received account for any of the years. To open a Credit Action Update screen, click the Credit Action menu, and select the credit action form you want to edit.

View a Credit Action Report
The selections you made on the Credit Action Update screen are reflected on the Credit Action report. If you selected Assumptions on the Update screen, that section appears on the report. To view a Credit Action Rents Received report, click the Reports menu, point to Credit Action, select the credit action form report you want to view, and click the hyperlink for the Credit Action report.
Return to the Menu Bar Section