Income Expense
Actual Income/Expense Summary
This is where you enter the amount of actual money generated
by the business operations within a given period of time. All features
previously described under the Projected
Income/Expense summary section apply here as well and some are not
shown on this eHelp page, i.e., screen sections, ratios link, copy average
link, average link and variance link.
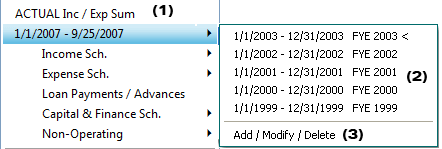
Click (1) to view a summary of the actual historical income / expense data for the currently selected year. Choose the summary year to view by choosing it from this list (2). The "Add/Modify/Delete" (3) item is your starting point if no years exist for this customer record.
Whole Numbers, Nearest Thousands and Nearest Millions
You can enter, show, and report numbers in Lending Cloud as whole numbers, nearest thousands and nearest millions. Click Whole Numbers, Thousands and Millions for more information.
Add / Modify / Delete Menu Item
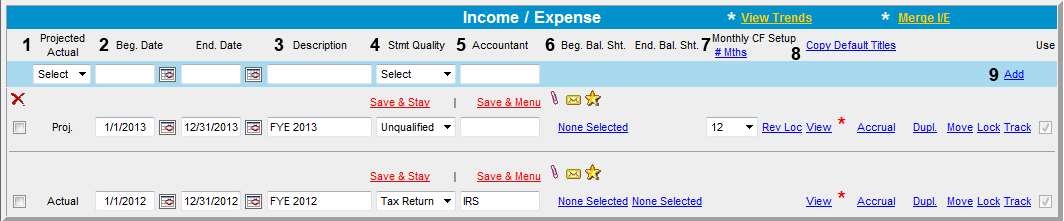
Choose either Projected or Actual data (1).
Enter a beginning and ending date (2).
Enter a description (Ex. FYE 2011) (3).
Choose the statement quality (Ex. Tax Form, Compiled, Qualified, etc.) (4).
Enter an accountant name if applicable (5).
Enter beginning and ending balance sheet dates (6).
You can choose to setup a Monthly Cash Flow (7).
The Copy Default Titles link (8) allows you to copy and default titles your system administrator has setup. You will get a "Warning of Possible Data Loss" message to confirm you want to copy from the defaults.
Click on the "Add" link to display this entry in the list
(9).
You can enter the dates in this section directly
using the following format: 01/01/2002 or 01/01/02. Do not use any other
symbol other than (/) to separate month/day/year. Otherwise, you can click
on the calendar (![]() )
symbol to show a clickable calendar button.
)
symbol to show a clickable calendar button.
The Accrual Link
Click here to display the accrual adjustments screen for this particular year.
The View Link
Click here to view the summary for this particular year. NOTE: The red asterisk indicates that this is the currently active year.
The Duplicate Link
Click here to duplicate this particular year's information. The duplicate will appear below the year you wanted to duplicate. Make adjustments to this information as needed.
Math in a Cell
You can enter math formulas in user-defined cells on the summary and trends screens to perform math calculations. You can type addition, subtraction, multiplication, division calculations and parenthesis within the math calculations. For more information, click Math in a Cell.
Annualized Statements
You can create annualized statements from an existing income/expense period which is less than 365 days (366 days for a leap year). Essentially, this means that you can take any interim statement (monthly, quarterly, etc.) and calculate the full year based on the available data. For example, if the quarterly statement's sales were $100,000, the annualized statement would show sales of $400,000.
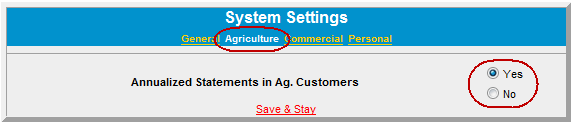
You can turn on or off the functionality for Annualized Statements on
the System Settings screen (Defaults->Customize->System
Settings). Annualized Statements functionality is available for Agriculture,
Commercial and Personal customers. To turn on or off Annualized Statements
functionality, click the Yes/No buttons on the System
Setting screen for the customer type. The following figure shows
an Agriculture customer with the Annualized Statements functionality turned
on.
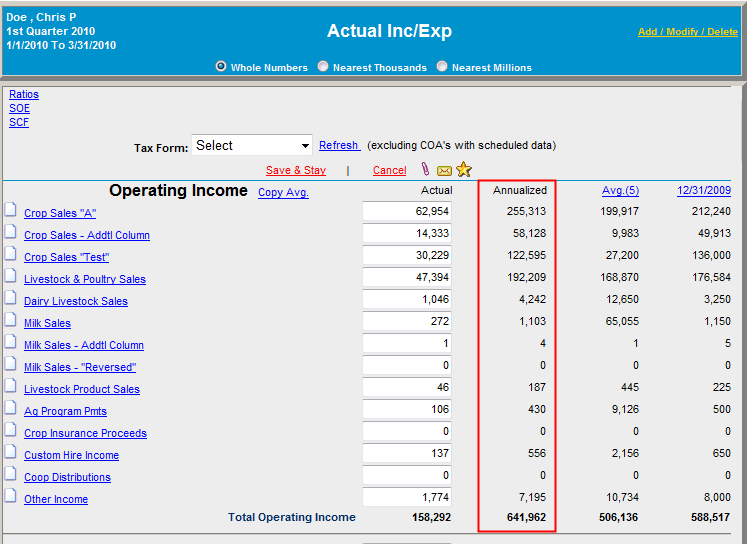
Income / Expense Annualized Statements Functionality
The following Income / Expense
screen shows an income/expense statement for the first quarter of 2010.
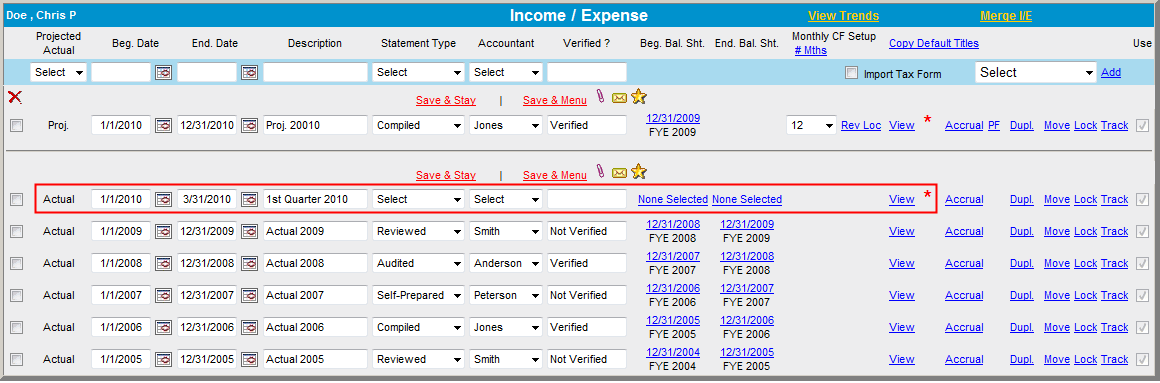
Actual Income / Expense Annualized Statements Functionality
The Actual Inc/Exp screen appears when you click View on the interim statement line of the Income/Expense screen. A column titled Annualized appears, which shows only if the inclusive difference between the beginning and ending dates for the period is less than 365 days (366 for a leap year). The calculation method for this column uses the inclusive difference in days between the beginning and ending dates for the period. In the following screen figure, the beginning date is 1/1/2010 and the ending date is 3/31/2010, which means that the inclusive difference between those two dates is 90 days. Since the year 2010 is not a leap year, the formula to calculate the annualized amount is: Inputted amount * 365 / 90. When the year is a leap year, the formula uses 366 days instead of 365 days. Ratios & Indicators are automatically annualized and will be calculated from the inputted numbers (not the annualized numbers).
Save & Stay or Cancel Symbols
If you change data and then click the Save & Stay link, the data will be saved with the changed data. If you change data and then click the Cancel link, the data will not be saved and the page will refresh with the original data. However, if you change data you do not have to click the Save & Stay link in order to save the changed data before clicking a hypertext link to open a new window. The page will save the data if you navigate away from the page using any hyperlinks or the menu. It will also save the data on hyperlinks that open pop-up windows where the data needs to be saved before the window is generated.
Interim Results
Input the interim result as an "Actual." Be sure to specify the actual Beginning Date and End Date and name it accordingly.
Add a “Projection” and name it appropriately then click “View.”
Click on the “Assumptions” link on the top right of the screen.
Click the “Select” link.
Select the “Interim year” you wish to “Annualize.” NOTE: It is the “Actual” year that is being Annualized.
You will then be presented with a host of options available to calculate the “Projected” annualized figure. For simplicity in this scenario the interim result is for three months. To calculate a full year result simply input 300% as your “Percentage Increase” in the “Sales” text box. This will adjust ever entry in the summary by the same amount.
There are many options to calculate the assumption. When a “percentage increase” value is entered into the sales amount, this percentage increase is forced across all values in the list. The user then has the option to modify each value by clicking on the “+/-” or “input whole number” radio button. These other options become useful when you see a scenario where all expenses have been incurred in the reported period and it is not appropriate to “annualize” them.
Once you have completed the “Assumptions” click the save and return link. You will then be presented with the Income/Expense summary screen for the “Annualized Period”. The “Annualized Results” can now be added to your income trends view and is also available in the drop list options.