Defaults
System Administration | Functionality Group
Security in Lending Cloud is separated into roles to which you can specify permissions (what users can do) for the roles. The roles are Super Administrator, Administrator, Supervisor and User. Security functionality can also be further defined to a specific individual in a role. The roles are assigned to functionality groups that have pre-determined permissions.
For example, a Super Administrator has full control over the permissions granted to all users and groups, so all check boxes are selected. An analyst needs access to all the features but probably not security, so check all features but security-related ones. A data entry person does not usually need access to defaults, security or projection features, so you can exclude those features for this group.

You specify permissions for functionality groups on the Functionality Group screen.
Add a New Functionality Group
The first step for a new group is to select a default model for your functionality group.
Click the Default Model / Form "Use?" link).
Select new models/forms from the Select "Use" Option pop-up dialog box that provides you the ability to select three different modes:
All Functionality Groups
My Functionality Group Only
None (of the functionality groups
To set up your users into functionality groups, click the Add New link. (Doing so generates the screen described below.)
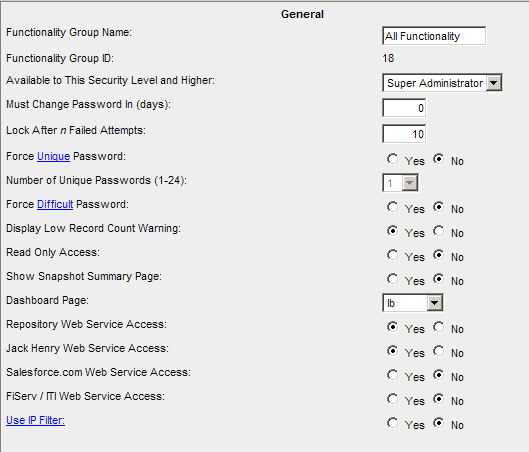
The following figure shows the General Section (right pane) of the Functionality Groups screen.
|
Other Security Features in Lending Cloud
Acceptable parameters are 30-90 days. If the expiration is set greater than 90 days the system will automatically set the expiration at 90 days. When this occurs you will be prompted to reset your password.
As a system administrator you can choose the number of failed login attempts that can occur before a user locked out of the system. The minimum setting is 3 and the maximum is 5 failed attempts before a user is locked out.
The passwords you setup must have a minimum of 8 characters, at least one uppercase letter, one lowercase letter, one numeric value and one special character (!, @, #, $, %, &, *). Example: Dgunderson@1
This feature provides an additional level of authentication to enhance the security of your data in Lending Cloud. With this feature you can limit access to the system from only certain locations based up the IP address. You can even provide an IP address range for access from multiple locations.
|
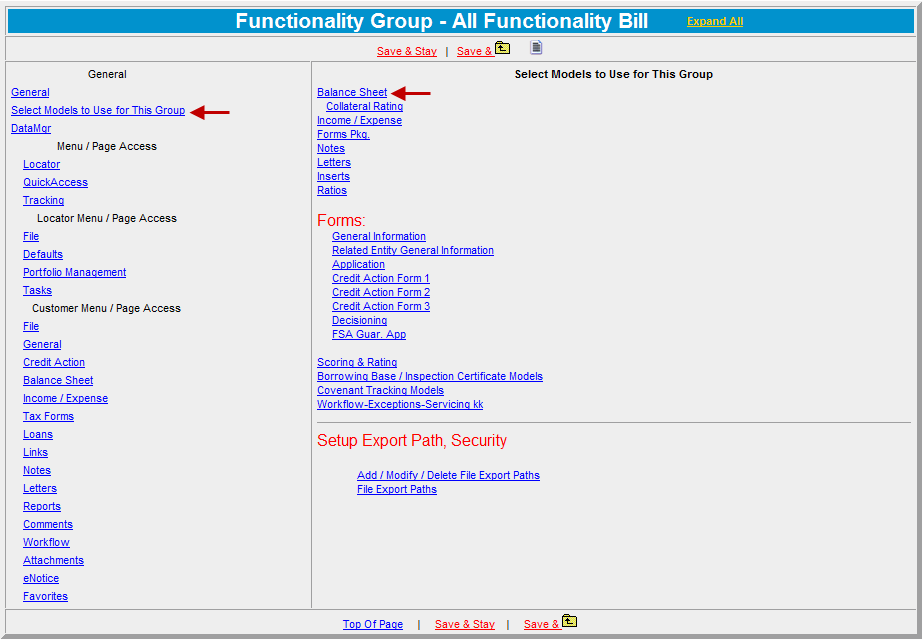
Select the models you want by clicking the applicable check boxes.
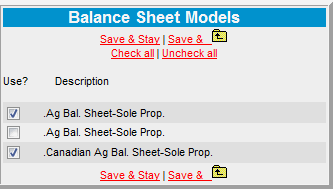
Click the "Save & Return" link to return to the Functionality Groups screen.
Repeat steps 1 - 8 for each of the links to the models in the right pane that you want to ad to this functionality group.
In the General pane, click each of the feature links and select the check boxes for the functions you want to assign to this functionality group.
Note:
You can also click the Expand All
link at the top of the screen to view all of the functions and their check
boxes.

Important: Some features require an additional purchase and appear dimmed and not available to your users until activated by Lending Cloud Solutions. For example, on the Income/Expense functionality list, there is a check box for Ind/ Exp->Industry Comparison. If activated for this functionality group, this feature will be available to your users from the main menu bar under Income/Expense.
Contact Lending Cloud Customer Support at 1-800-264-0787 for more information.
Set up a Security Export Path
You can control the destination for data exported from Lending Cloud.
Click the Add/Modify/Delete File Export Paths link.
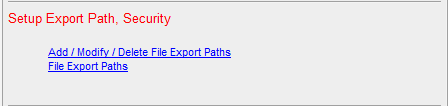
In the Export Path dialog box, set up the network drive(s)/ folder(s) paths you want your users to export to.
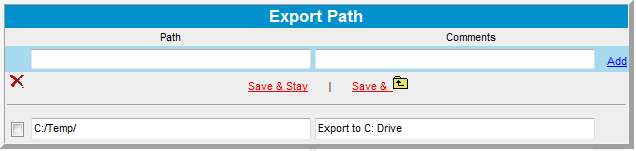
Specify the export destinations.
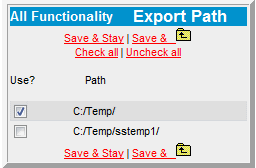
Click the File Export Paths link.
Select the Use? check box(es) to assign the paths to the functionality group.
Continue to the last step of this process -- Users
Return to System Administration