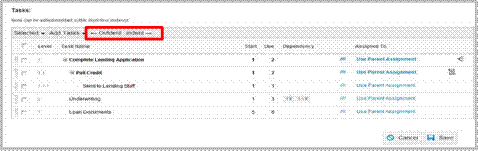
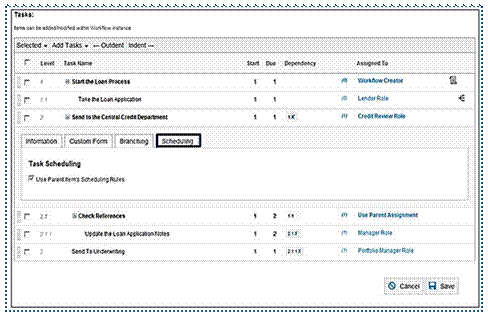
Workflows Task Setup
Each Task contains the following basic information:
-
Task Name: Click in the row under this column and enter the name of the Task.
-
Start: Click the number under this column and enter the number of days for the Task to start from the creation of the Workflow.
-
Due: Click the number under this column and enter the number of days for the Task to be completed from the creation of the Workflow.
-
Dependency: Indicates if one Task is dependent on another for completion. Click in the row under this column and enter the Task Number of any Tasks that should be completed before this Task begins.
-
Assigned To: This option will default to “Use Parent Assignment”, but may be changed based on preferences during set up.
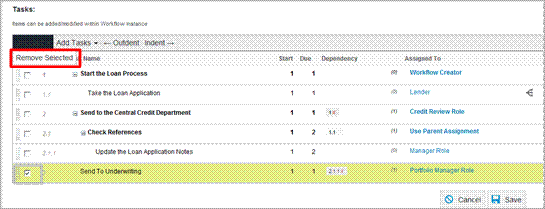
Parent/Child Tasks
Tasks can be nested to create parent and child relationships. A child Task cannot begin until its parent Task has begun, and a parent Task cannot be completed until all of its children Tasks are completed. This allows for groups of related Tasks to form phases of a Workflow. Use the Outdent and Indent buttons in the toolbar to move nest or un-nest Tasks.
Deleting Tasks
To delete a Task, click the check box to the left of the item to be deleted and choose Remove Selected from the Selected drop list.
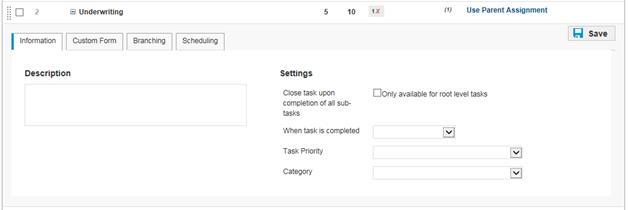
Additional Task Options
By hovering the mouse pointer over the right end of a task row and clicking the arrow that appears, the following items will be displayed giving users the ability to add additional information to a Task:

The Information tab contains settings for that Task
-
Description: A description of the task may be entered in this text box.
-
Close task upon completion of all sub tasks: If the task has sub tasks, this option can be selected to have the task be closed automatically when all of the sub tasks are completed. The presence of a Branching Question or Custom Form with required fields will prevent the task from completing automatically.
-
When task is completed: This option determines if any actions will be taken when the task is completed. The options available are:
-
-
[blank]: No actions will take place when the task is completed. This is the default value.
-
Lock Attachments: All attachments associated with the Workflow, both in tasks and at the Workflow level, will be locked when the task is completed.
-
Unlock Attachments: All attachments associated with the Workflow, both in tasks and at the Workflow level, will be unlocked when the task is completed.
-
-
Droplists for any Custom Attributes that have been marked as ‘Edit on Template’ will be present. Select the desired value from those lists. This value will appear for that task when a Workflow is created.
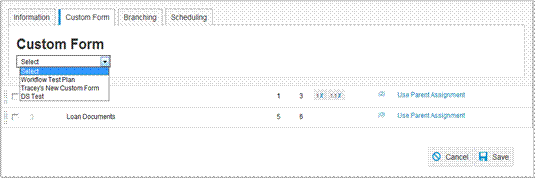
A Custom Form can be added to each Task. Select the Custom Form tab and select the desired Custom Form from the drop list. Note that if the Custom Form contains required fields those must be filled out prior to the Task being completed.
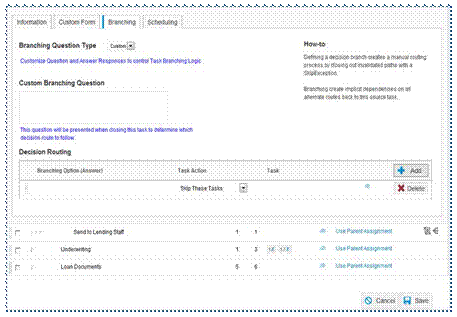
Task Options - Branching Logic Tab
Branching Logic is used to make Workflows responsive to variations in processes. The Workflow will prompt users to do what is needed to complete the Task based on the answer given to the branching question. If a branching question is present, the Task cannot be completed until the branching question is completed and saved.
Take the following steps to create a decision branch.
1. Select “Custom” in the Branching Question Type list. If the Custom Branching option is selected, the field will expand to include a branching question.
2. The System Administrator will type a question into the Custom Branching Question field that they would like the user to answer once the Workflow is set up. This question will be presented when opening this Task to determine which decision route to follow.
3. Click the Add button and then click the space in the row below the Branching Option (Answer) column to enter the branching option answers.
4. Select an action from the Task Action drop list.
5. Click the space in the row below the Task column and enter the Task number to skip. In our example, we have chosen 1.1.
6. Optionally, an action can be selected to occur when that option is selected. Lock Attachments will lock all attachments associated with the Workflow. Unlock Attachments will unlock any locked attachments associated with the Workflow.
Each Task by default will use the scheduling options set up on the Workflow Template. If an individual Task needs to respond differently, the scheduling options can be changed for that Task. To change these settings, uncheck the Use Parent Item’s Scheduling Rules check box. This will reveal the scheduling options, which are the same as the options available for the Workflow Template.
You can determine whether the summary-level status of a workflow is automatically set after a task has been completed. For parent tasks, you can select the status that is set after the task has been completed. For child tasks, you can either use the auto status rules of the parent or select a specific status. For child tasks that do not use the parent status, the lowest completed task determines the status.
Note It is recommended that you use the auto status setting at the parent level.