When you open DMS eNotice for the first time and have not validated your email address via the User Settings page, a pop-up window prompting you to validate the address appears.
Note Your From email address for use with DMS eNotice must end with the standard domain @onlinequity.com.
You begin the email validation process from this window. You also have
the option to return to the User Settings page to save and validate your
email address.
To Validate Your Email Address
The steps below describe a one-time process for validating your e-mail address and providing you with access to DMS eNotice. If your email address changes, you must complete the validation process again. You must be able to view html-formatted e-mails to use the validation process.
Note You
must remember the customer record and the location you were in when you
clicked the eNotice symbol for
the first time. You need to return to that
record/location as part of the validation process.
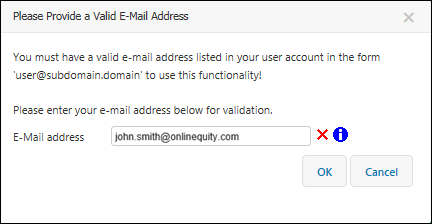
1. On the validation
prompt pop-up window, confirm that your email address is correct. Then
click the OK button.
A pop-up window appears.
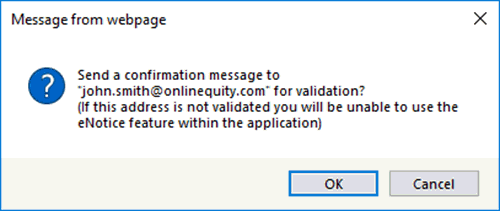
2. Click the OK
button to send a confirmation message to your email address.
A pop-up window with a message indicating that a confirmation message has
been sent to your email address appears.
3. Click the OK button to close the pop-up window.
4. Close the DMS eNotice window.
5. Log out of Lending
Cloud. You must log out correctly to avoid the restriction on concurrent
logins and to log in again successfully.
You will log back in later in the validation process.
To log out of Lending Cloud correctly, click the vertical ellipsis ![]() in the upper-right corner of the screen to display a drop-down menu and
then select Log Out from the menu.
in the upper-right corner of the screen to display a drop-down menu and
then select Log Out from the menu.
6. Close your browser window.
7. Access your email application and open the confirmation message that the system sent you.
8. In the message, click the Click here to validate link.
9. Log back into Lending Cloud.
10. Return to the customer record and the location where you were when you clicked the eNotice symbol for the first time.
11. Click the eNotice symbol to re-enter DMS eNotice.
Now, when you enter the DMS eNotice window, a standard e-mail window appears. The message in the window contains a link to the section of the program you are working in. This enables the recipient to see what is available for viewing. You can add any additional information to the message and modify the subject line if needed. You do not have to include the link in the email and can delete it before sending the eNotice.
You can automate the selection of individuals for email eNotices by clicking the To and CC text below the From field. Click the magnifying glass icon on the window that appears to display a list of valid email addresses in Lending Cloud. Selecting email addresses from the list saves you time compared to entering individual email addresses manually.