Comparing Borrowers to Peers in Your Portfolio
This section explains how to compare and benchmark an agricultural producer to similar producers in your Lending Cloud portfolio. When in a customer record, you develop a comparison using the Peer Comparison Setup page. To access the page, select the Peer Comparison Setup link on the Peer Comparison page.
Note System administrators manage the ability of users to access Ag Peer Comparison and the ability of users and administrators to use specific functionality in the feature. Information about setting up access and controlling functionality is located in the Ag Peer Comparison System Administration Settings section.
To select your portfolio data for peer comparisons
Take the following steps to use data from your Lending Cloud portfolio for peer comparisons and benchmarking:
Note To change the settings in all fields on the Peer Comparison Setup page back to the default settings for your institution, click the Reset to Defaults button in the upper-right corner of the page.
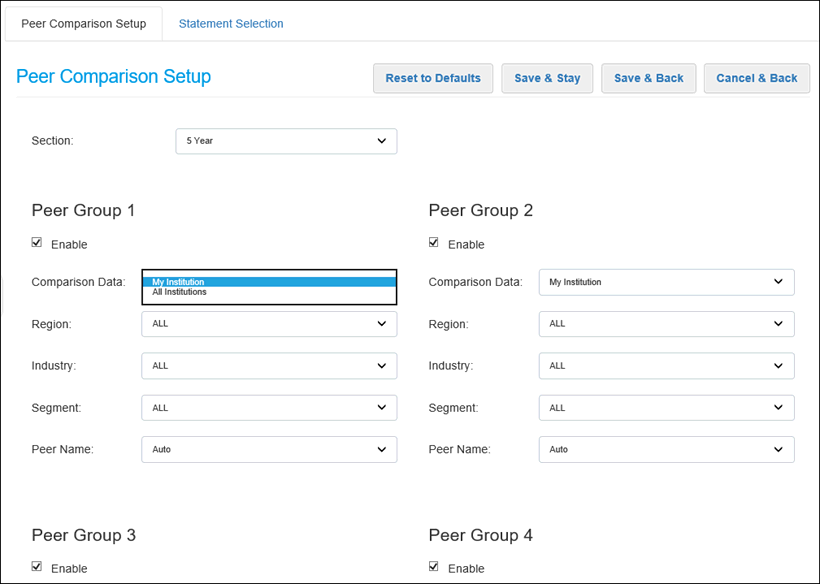
1. The Section field determines the number of years of information to use for data points in comparisons with all peer groups. The standard default setting is 5 Year. System administrators can change the default value using the Section field on the Peer Comparison Setup defaults page. Other options are 3 Year, 7 Year, 10 Year, and ALL. The ALL option uses all years of available information for data points in comparisons with all peer groups.
2. For each peer group that you want to include in the comparison, select the Enable check box.
3. From the Comparison Data drop-down list for each applicable peer group, select My Institution.
Steps 4-7 describe functionality related to the Region, Industry, and Segment categories, which are used to determine the data that will be calculated for peer comparisons.
Note If your institution previously saved Region, Industry, or Segment settings on specific customer records, some of those settings might not match new default values established by your institution. When you select Ag Peer Comparison in the customer record, if customer-level values differ from the institution-level default values, you will receive a warning message describing the conflicting settings. You will be unable to save changes and exit until you update the customer-level settings to align with the institution-level default settings. See To set institution-level defaults for categories associated with calculations in the Ag Peer Comparison System Administration Settings section for information about default settings for the Region, Industry, and Segment categories.
4. Select the appropriate option from the Region drop-down list. Up to three options are available.
ALL - This option uses the USDA region of the borrower for the peer comparison.
USDA - This option enables you to use the USDA region of the borrower, or another USDA region for the peer comparison.
User Defined Region - This option is available only for peer comparisons inside your institution's portfolio. If your institution uses the User Defined Region feature, your system administrator sets up the established regions. The regions are made up of only your institution's data, are defined by the locations that they contain, and have no impact on Moody's data.
Note Whether the USDA and User Defined Region options are available is based on your institution's default settings. The Country and State options are not available.
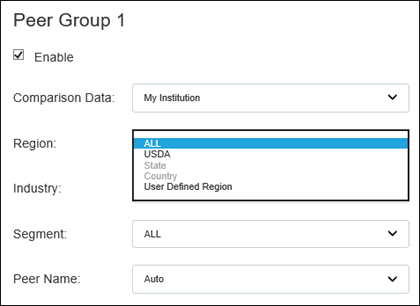
If you select USDA or User Defined Region, the Sub Region field appears under the Region field.
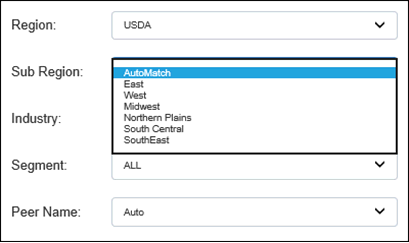
5. If you select USDA for the region, also select the appropriate option from the following on the Sub Region drop-down list:
AutoMatch
This option uses the USDA region of the borrower for the peer comparison.
East
West
Midwest
Northern Plains
South Central
SouthEast
The last six options correspond with the regions defined on the USDA Map of Regions. If you select one of the USDA regions, the system uses data from that region for the peer comparison, regardless of the borrower's USDA region.
If you select User Defined Region for the region, also select the appropriate option from the Sub Region drop-down list.
6. Select the appropriate option from the Industry drop-down list.
ALL - No filter
NAICS2 - Use the first two digits of the NAICS code.
If you select this option, the Industry Sub Group field appears under the Industry field. If you select AutoMatch from the Industry Sub Group drop-down list, the system uses the first two digits of the borrower's NAICS code. Otherwise, select another option.
Schedule Product - Use a product group.
If you select this option, the Industry Sub Group field appears under the Industry field. If you select AutoMatch from the Industry Sub Group drop-down list, the system uses the borrower's primary gross revenue stream. Otherwise, select one of the other options - Ag, Crop, Livestock, LivestockProduct, or Mixed.
NAICS4 - Use the first four digits of the NAICS code.
If you select this option, the Industry Sub Group field appears under the Industry field. If you select AutoMatch from the Industry Sub Group drop-down list, the system uses the first four digits of the borrower's NAICS code. Otherwise, select another option.
NAICS6 - Use the first six digits of the NAICS code.
If you select this option, the Industry Sub Group field appears under the Industry field. If you select AutoMatch from the Industry Sub Group drop-down list, the system uses the first six digits of the borrower's NAICS code. Otherwise, select another option.
Note Whether the NAICS2, Schedule Product, NAICS4, or NAICS6 option is available is based on the default settings used by your institution.
7. Select the appropriate option from the Segment drop-down list.
ALL - No filter
Revenue - Use gross revenue.
Note Whether the Revenue option is available is based on your institution's default settings.
If you select Revenue, the Segment Sub Group field appears under the Segment field. Select one of the following options from the Segment Sub Group drop-down list:
AutoMatch - The system will use the borrower's revenue from the latest financials to determine which revenue band is selected.
For example, if the borrower had revenue of $2.2 million last year, $1.8 million two years ago, and $1.5 million three years ago, the system will use the $2MM-<$5MM band for comparison. A list of revenue bands appears below. Since a comparison generally covers multiple years based on your setting in the Section field, peers can fall into different revenue bands over that period. When you select AutoMatch and run a comparison, the system will return data for peers that fall into the borrower's most recent revenue band ($2MM-<$5MM) in any of those years.
Note If the revenue band of returned peers does not consistently fall into the borrower's revenue band over the designated period, you might find it more helpful to select a specific revenue band for a new comparison to obtain more consistent results. Also, if you select AutoMatch and find that the revenue band of returned peers does not consistently fall into the borrower's revenue band over the designated period, you can select ALL from the Segment drop-down list. Running a comparison with no revenue filter is more likely to return a greater number of peers that consistently fall into the borrower's revenue band. After reviewing the returned data, if more specific results are desired, use the Revenue option and select the appropriate revenue band for a new comparison.
<$100K
$100K-<$500K
$500K-<$1MM
$1MM-<$2MM
$2MM-<$5MM
$5MM-<$10MM
>=$10MM
Other - Use peers, regardless of revenue band.
8. Use the Peer Name field to create the name of the peer group. Select one of the following options.
Auto
The system generates the peer group name based on product, region, and revenue criteria that you selected in preceding fields.
Simple
The system uses standard naming for the peer group, for example, "Peer1".
Manual
This option enables you to apply a preferred description/short name to the peer group. When you select Manual, a field appears under the Peer Name field. Enter the preferred description/name in the field.
9. Click the Save & Stay button or the Save & Back button. If you click the Save & Back button, the system returns you to the Peer Comparison page.