Collateral Analysis
When you are analyzing loan collateral in Lending Cloud, you can access both the collateral value held by your organization and also the collateral value maintained by prior lien holders. The functionality provides you with more flexibility when analyzing the collateral value used on a loan application. Some features here include.
- Calculating prior lien values into loan amounts
- Adjusting cross-collateral values
- Viewing collateral models at either summary or detail levels.
Setup System Settings First
Functionality for new collateral analysis features must be setup by a qualified system administrator. While collateral analysis features are available for agriculture, commercial and personal accounts in Lending Cloud, the latest enhancements have been specific to the commercial accounts.
- From the Defaults drop-down menu, select Customize > System Settings.
- Select the type of account (Agriculture, Commercial, or Personal).
- In System Settings, choose from the default settings for collateral models, prior liens and adjustments for cross Variable "collateralization" is not defined.
- Click Save & Stay when choices have been made.
Add / Modify / Delete
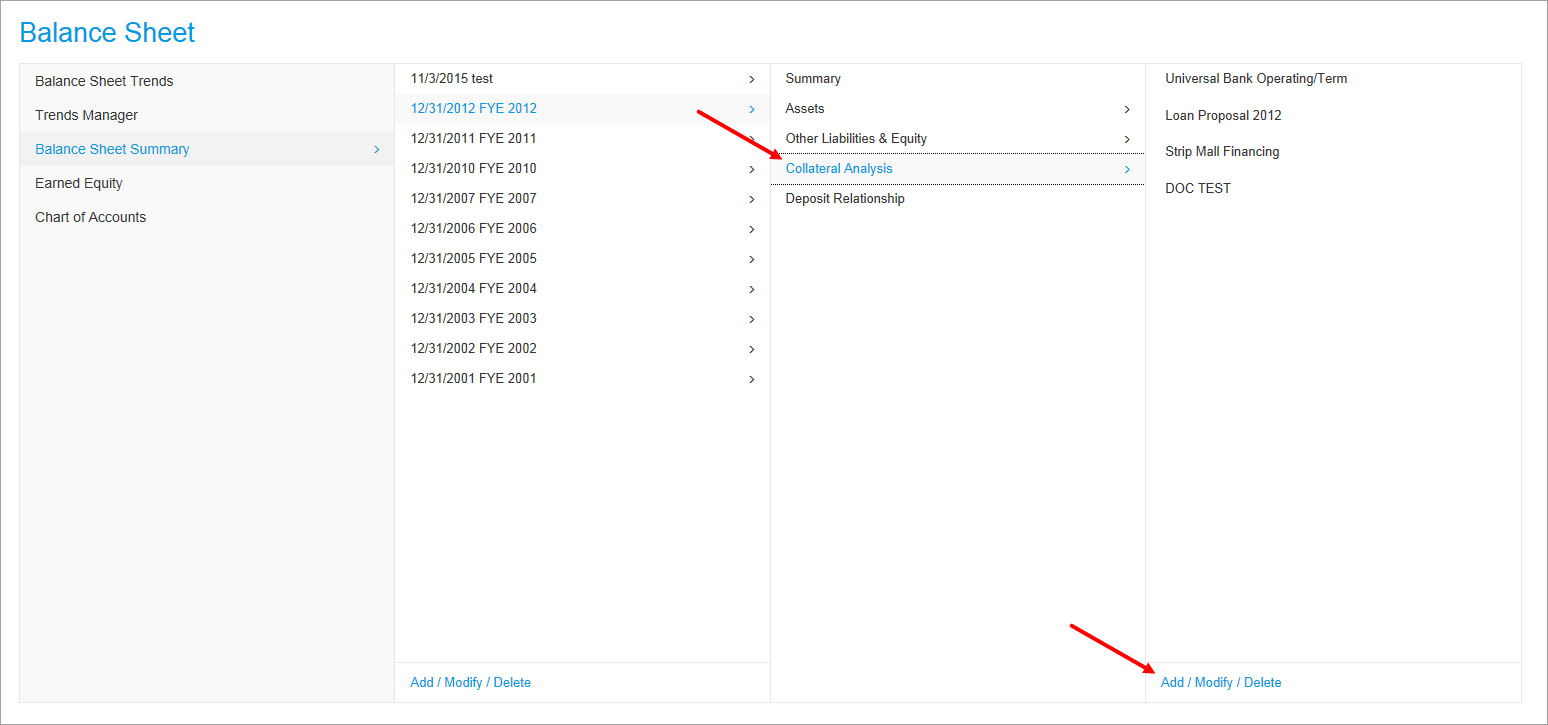
Here is where you access, view, add, modify, and delete information which is specific to any collateral value for loans held by your organization and the collateral value maintained by prior lien holders. For a specific balance sheet, click Collateral Analysis, then click the Add / Modify / Delete link at the bottom right of the screen.
Collateral Analysis Screen
On the Collateral Analysis screen, you define loan groups, to which you assign collateral. A loan group can contain one or more loans.
Lending Cloud recommends the following order for setting up and completing your analysis.
- Verify that you are doing collateral for the correct balance sheet year.
- Address any prior liens before addressing loans with your institution - A prior lien is a claim by a creditor on property or assets of a debtor in which the property may be held as security or sold in satisfaction (full or partial) of a debt. Liens may arise through borrowing transactions where the lender is granted a lien on the borrower's property. Other examples of liens include tax liens against real estate with delinquent taxes, a mechanic's lien against property on which work has been performed, and a landlord's lien against crops grown by a tenant.
- Choose how to calculate prior liens - Deduct from Collateral Value (default) reduces the amount of the prior lien from the current collateral value. Add to Loan Amount calculates LTV and Margin to Collateral Ratios for adding prior liens to the loan amount. Note that when you select this option, you change the calculations on all existing analyses.
- In your reports, four asterisks (****) next to the total loan amount and on the Decisioning tab of your Credit Action form indicate that the total loan amount includes the prior lien amount.
To add a loan group here follow these steps:
-
-
In the Loan(s) Description field, enter a description for the loan(s) that are associated with the collateral.
-
In the Lien? field, choose whether the loan belongs to your organization or is a prior lien.
-
Use the Scoring & Rating check box to indicate whether you want this collateralized loan included in your scoring & rating of this customer record (Only available if it is your organization's loan).
-
In the Amt to Use drop-down list, choose one of four "amount to use" categories for this collateralized loan.
- As Marked On Schedule (Self explanatory)
- Current Principal/Advance (Principal on existing loan / Advance for new loans)
- Present Commitment (Maximum current lender commitment)
- Proposed Commitment (Maximum proposed lender commitment)
-
5. Select either the LTV or Discounted LTV option.
6. Click the Add button. When you click Add button, it takes you into the loan group's "Detail" screen. This screen is comprised of the Loans, Collateral, and Analysis sections.
Loans
In the Loans section, select the loan you want to collateralize by clicking on the Add From Loan Balance button in the upper right corner.
On the Select Loan dialog box that appears, select check boxes in the Add column and click the Add Loans button.
Collateral
There are two methods of data entry, Lookup and Direct.
Lookup Entry
Click the Add Collateral button in the top-right corner of this section to access the lookup list for this entry. The Copy Default % button in the top-right corner allows you to copy in the default loan to value percent from the Balance Sheet Chart of Account in the customer record.
SPECIAL FEATURE: You can view balance sheet schedule data from the collateral analysis section. As you add collateral information from the balance sheet using the Add Collateral button, it is now displayed as links in the Description column that you can click on to view the make up of your collateral and select individual items from the schedule without having to bounce back and forth between the balance sheet and this section (Example: Machinery & Equipment shown below).
Direct Entry
1. Click the Acct Type link directly above the Description box to select a Chart of Account type.
2. In the Description field, enter a description of the collateral.
3. In the Type field, describe the type of collateral.
4. In the Value field, enter the value of the collateral.
5. In the Adv Rate (%) field, enter the discount percentage of the collateral or what value you can realistically get from the collateral (example: 75% of a $50,000 tractor).
6. The Disc Value will automatically calculate for you.
7. This step provides you an alternative to inputting prior lien data into the collateral analysis section. We've added Prior Liens and Auto Calc columns here. If you want to use the same prior lien calculations you have always used, leave the Auto Calc check box active. If you want to override the calculation, deactivate the Auto Calc check box. The Prior Lien field will then display for you to enter the prior lien number you want. The system will calculate the remaining collateral available based upon the new number.
8. The Coll Amt. will also display here automatically If its associated Auto Calc check box is active. If not, you can enter in your own numeric data and you can change the status of this check box as needed once it is displayed in the list on this screen.
9. You can also use the 3rd Party link to select a third party. See To add collateral tied to a third party below for more information.
10. Click the Add button to display this entry in the list.
11. You can also bring in multiple loans at one time.
In the Collateral section, the Used field contains the amount of the value of the collateral that has been used. The Available field contains the amount of the value of the collateral that is available.
Note If prior liens are deducted from the value of collateral, your system administrator can prevent the Used and Available fields from appearing in the Collateral section by taking steps described in Controlling the Display of Used and Available Amount Fields in Collateral Analysis.
Analysis
This section automatically displays the results of your collateral calculations. There is also a Collateral Rating link here. Clicking on this link will display a pop-up window where you can choose to apply a pre-determined rating scale specific to the type of collateral you are working on (machinery, land, etc.). This features provides a quick reference as to whether your institution finds this collateral acceptable for the loan you are reviewing.
Once you return to the Collateral Analysis screen you will notice that the five previously empty columns on the right side now have the applicable collateral data displayed. Those columns are described below.
- # Of Loans - Displays the number of loans added in the detail section.
- Loan Amt - The amount of collateral pledged for the loan(s).
- Total Collateral Value - The value of the collateral amount determined by the lender.
- Margin Loan/Collateral - This number represents the amount of collateral available to cover the loan amount requested.
- % Loan to Coll. - This number represents the amount of collateral this specific loan request requires from the total available.
Collateral Analysis Procedure: Things To Remember
- Step #1: Verify you are doing collateral for the correct balance sheet year.
- Step #2: Address any "Prior Liens" before addressing loans with your organization.
Third Party Information
Lending Cloud enables you to add third party assets and information regarding the owners of the third party assets. The link to set up third parties is available on the Collateral Analysis screen. Links to associate the parties with collateral is available on each "Detail" screen.
To set up a third party
-
On the Collateral Analysis screen, click the 3rd Party Information link near the upper-right corner. The 3rd Parties screen opens.
-
Enter the name of the third party.
-
Click the Add button. The 3rd Party Information screen for the third party opens.
-
Enter the country, legal name, address, city, state, and postal code of the third party.
-
Click the Add button. The system adds the third party and also lists it on the 3rd Parties screen.
-
(Optional) To add another third party, click the Save & Back button. The system returns you to the 3rd Parties screen.
-
(Optional) Repeat steps 2-5 to add the third party.
-
After adding information for all third parties, click the Close button.
Note: On the 3rd Parties screen, you can access a party's address information by clicking the Detail link in the row that contains the name of the party.
To add collateral tied to a third party
-
Enter in the information about the collateral using the Direct Entry method.
-
Click the Select link under the 3rd Party field.
-
Select the appropriate third party and click the Add link.
-
Once the collateral has been added you can click the Detail link. This shows more detail about the third party asset. These fields are defined in the default area of the program.